
From Closet to Pantry: How to Maximize Kitchen Storage Space

My only regret is that we didn’t do this sooner!
For five years, we had a closet that served a variety of functions. I honestly don’t know why I didn’t think of this sooner.
The Evolution of Our Kitchen Storage
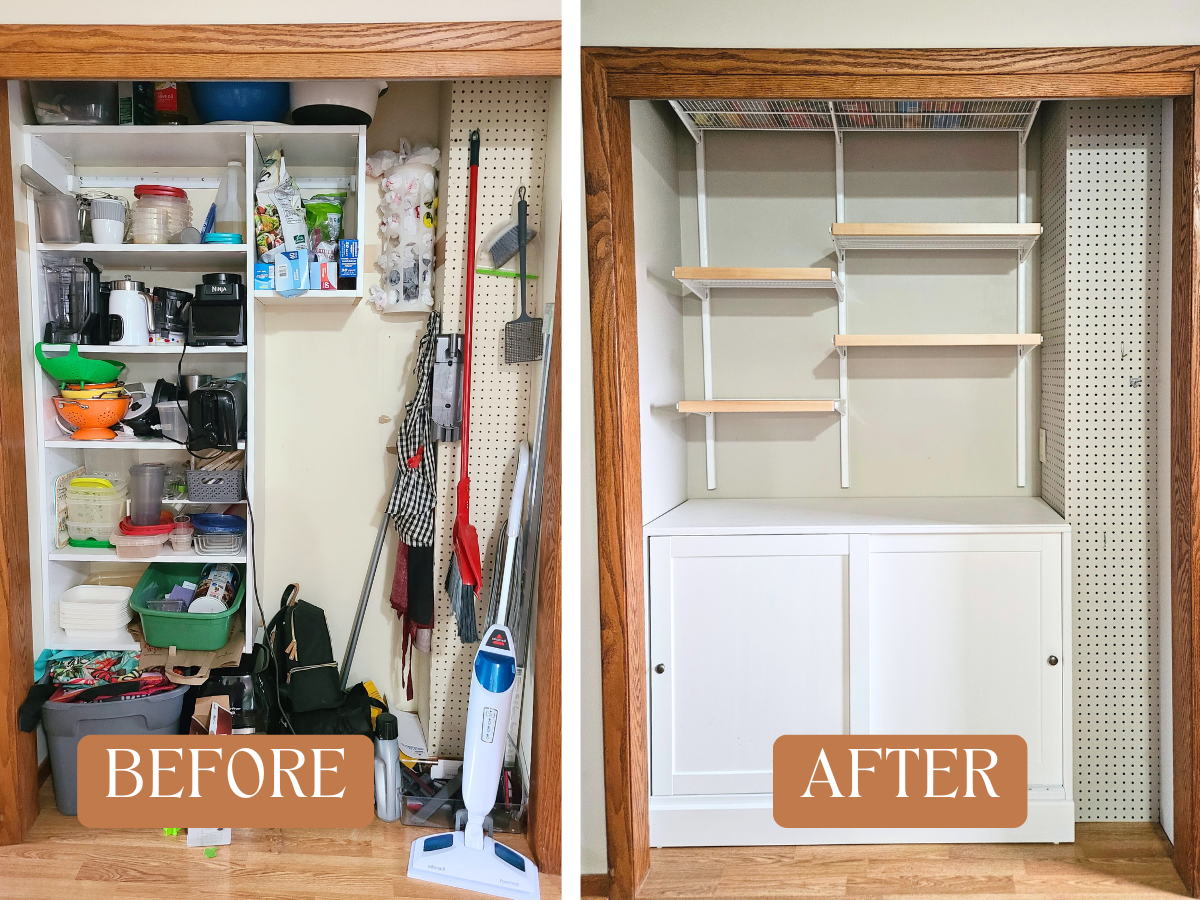
When we first moved in to our home, I remember being so frustrated with the lack of food storage space we had in our kitchen. We don’t live in a huge house, but it’s not tiny either. We’ve got about an 8ft wall of uppers and lowers that make up the bulk of the kitchen storage available to us along with a closet at the end of the aisle. The previous owners used the closet for things like vacuums, brooms, cleaning supplies, etc. so naturally that’s what made sense to us too.
Not long after moving in, I told Luke we needed more storage for dry goods; they were getting lost in our deep lower cupboards. He worked night shift at the time, and I worked an in-office job. I came home one day to an inexpensive shelving system in the closet, I was thrilled! $60 later and we finally had some additional storage. I immediately reorganized. We weren’t able to fit all dry goods so we decided to keep everyday staples in the cupboards, and things like cans, pastas, etc. in the closet.
Fast forward to a few years later when we DIY’d a shaker style on to our kitchen cabinets and gave them a fresh coat of paint along with some new hardware. The refresh quickly turned into a decluttering and kitchen organization project as well. We were determined to find a new solution. We decided to move the dry goods back to the cabinets and turn the closet shelving into appliance and Tupperware storage. This system worked okay for us, until it didn’t.
The Tipping Point
We’re in the early stages of building our forever home, and as we’ve worked with our architect to comb through all our current pain points and how we can solve for them in our new home, one of my non-negotiables is a walk-in pantry with cabinet storage and countertop space. I WILL get the pantry of my dreams one day. However, on a random weeknight we spontaneously decided to put our building plans on pause and stay in our starter home a while longer. That same night we made the agreement that if we were going to stay in this home, we HAD to make some updates – starting with a pantry. We ripped the sliding doors off the closet right then and there with zero plans in place!
While it sounds a little chaotic, I actually really recommend this step in the process. I call it marinating. I need to look at the space for awhile to brainstorm the art of the possible and get inspired. It absolutely elevated my stress levels looking at the mess on a daily basis, but it also helped me come up with some great ideas. I also knew that the one decision I had already made was that the doors would go.
This was my initial thoughts for the space.

The Vision
The only limitation we had with this project was the corner where the pegboard was. It covers some mechanical necessities, which meant it had to stay. That left us with about 48′ of width to work with. I Googled and frantically searched Pinterest for creative pantry ideas, creative storage solutions, and DIY pantry options. I found a few closet conversions that I liked, but nothing that seemed similar to our space. I knew I wanted to have a flat surface in the pantry with open shelving. I decided to start with the search of a cabinet, and quickly fell in love with the Havsta Ikea Cabinet. The sliding doors were exactly what we needed because we didn’t plan to remove the closet trim. Had we gone with a traditional type of cabinet, the doors wouldn’t have been able to open all the way. Next, I thought critically about the shelving I wanted. This was going to be an open space, so I knew I wanted this pantry transformation to be beautiful, and I was ready to make an investment in it. I started to consider what kind of containers I would want to store my pantry items in, what their dimensions were, how much space they would take up, etc. to give me a better idea of how much shelving I would actually need.
I had never been to The Container Store before, but it felt like the right time to check it out. The store is over an hour away from our home so we made a day out of it. We loaded up the kids, took them to lunch, and checked it out. It’s an organizer’s happy place that’s for sure! I initially wanted to look at their pantry organization solutions, but we learned they also had shelving solutions and I fell in love with their Elfa shelving system. I really liked the idea of wire shelves for less dust collection, but the selling point was the the ability to add fascia to them.
We’re all about doing things on a budget, so we decided to do our due diligence and check major home improvement stores and online options before making a commitment. Since wire shelving is so common we were sure we would find what we were looking for elsewhere. Turns out, we didn’t and I was totally okay with it. This shelving system was not inexpensive, but the value was so worth it.
Let’s Get to Work
Once we knew what we were going for, it was time to bring the vision to life. At this point, we had already picked up the cabinet and put it together, and knew what type of shelving we were moving forward with, we just weren’t exactly sure what our layout was going to be. The closet needed some prep work before we would be able to piece it together.
Here’s the steps we followed.
-
- Removed everything.
- Added the cabinet, which we later removed for other prep work, but it was helpful to add for visualization.
- Created our layout. I found that painters tape was incredibly helpful to determine how much shelving we were going to need, where we would place it, and more. We also decided to add an outlet so we mapped that out at this stage too. Thankfully our basement rafters are open so this was an easy addition.
- Ordered our shelving from the Container Store for pickup, which was ready within a few days.
- Picked up new pegboard to replace what we currently had. Cut it to size and painted it.
- Repaired the closet walls from previous storage solutions.
- Added some fresh paint, and put it all together.
It sounds easy, and it really was, but I’d be lying if we didn’t hit a few roadblocks along the way. Early on, we realized that the place where we wanted to run the outlet wasn’t going to work. Unfortunately we realized this AFTER Luke put a hole in the wall 😂. After patching, we were able to add an outlet in another location.
If you’re thinking about repurposing a closet into a pantry, I highly recommend going for it.